Finding the Minecraft seed of the "Skull on Fire" 2010 painting
Done by the Minecraft@Home team & andrew_555#5879
Written by Tomlacko#2976
Flower reversal section written by MC#2636 (PseudoGravity) & andrew_555#5879 (Kminster)
Contents
The world on the screenshot 18
Render distance chunk borders 22
Image deJPEGifying with custom AI 24
Interactive overlay & screenshotting bot (+3D renderer) 25
3D renderer in browser & live blockdata stream 26
Flower reversal to get the seed 27
About
The project
This is a project about finding the seed of a Minecraft world visible in the "Skull on Fire" painting made by Kristoffer Zetterstrand in 2010, which was then included in the game itself.
The painting
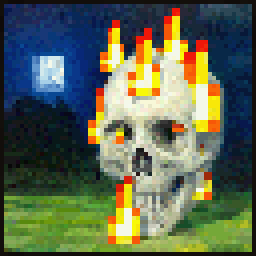
This is what it looks like in-game:

Here's the same image but resized 4x:
This painting was added into the game in Beta 1.3, even though preparations for it (in the code) were already made in Beta 1.2_01 (https://minecraft.gamepedia.com/Painting).
It was the last "true" painting added to the game. The wither painting, which is the only newer painting that has since been added, wasn't made by Kristoffer and wasn't based on any original painting. Yes, if you didn't know, all the other paintings in the game are downscaled versions of real paintings and they can be found in their full size here: https://imgur.com/gallery/R7qao
So, this is how the original "Skull on Fire" painting looks like:
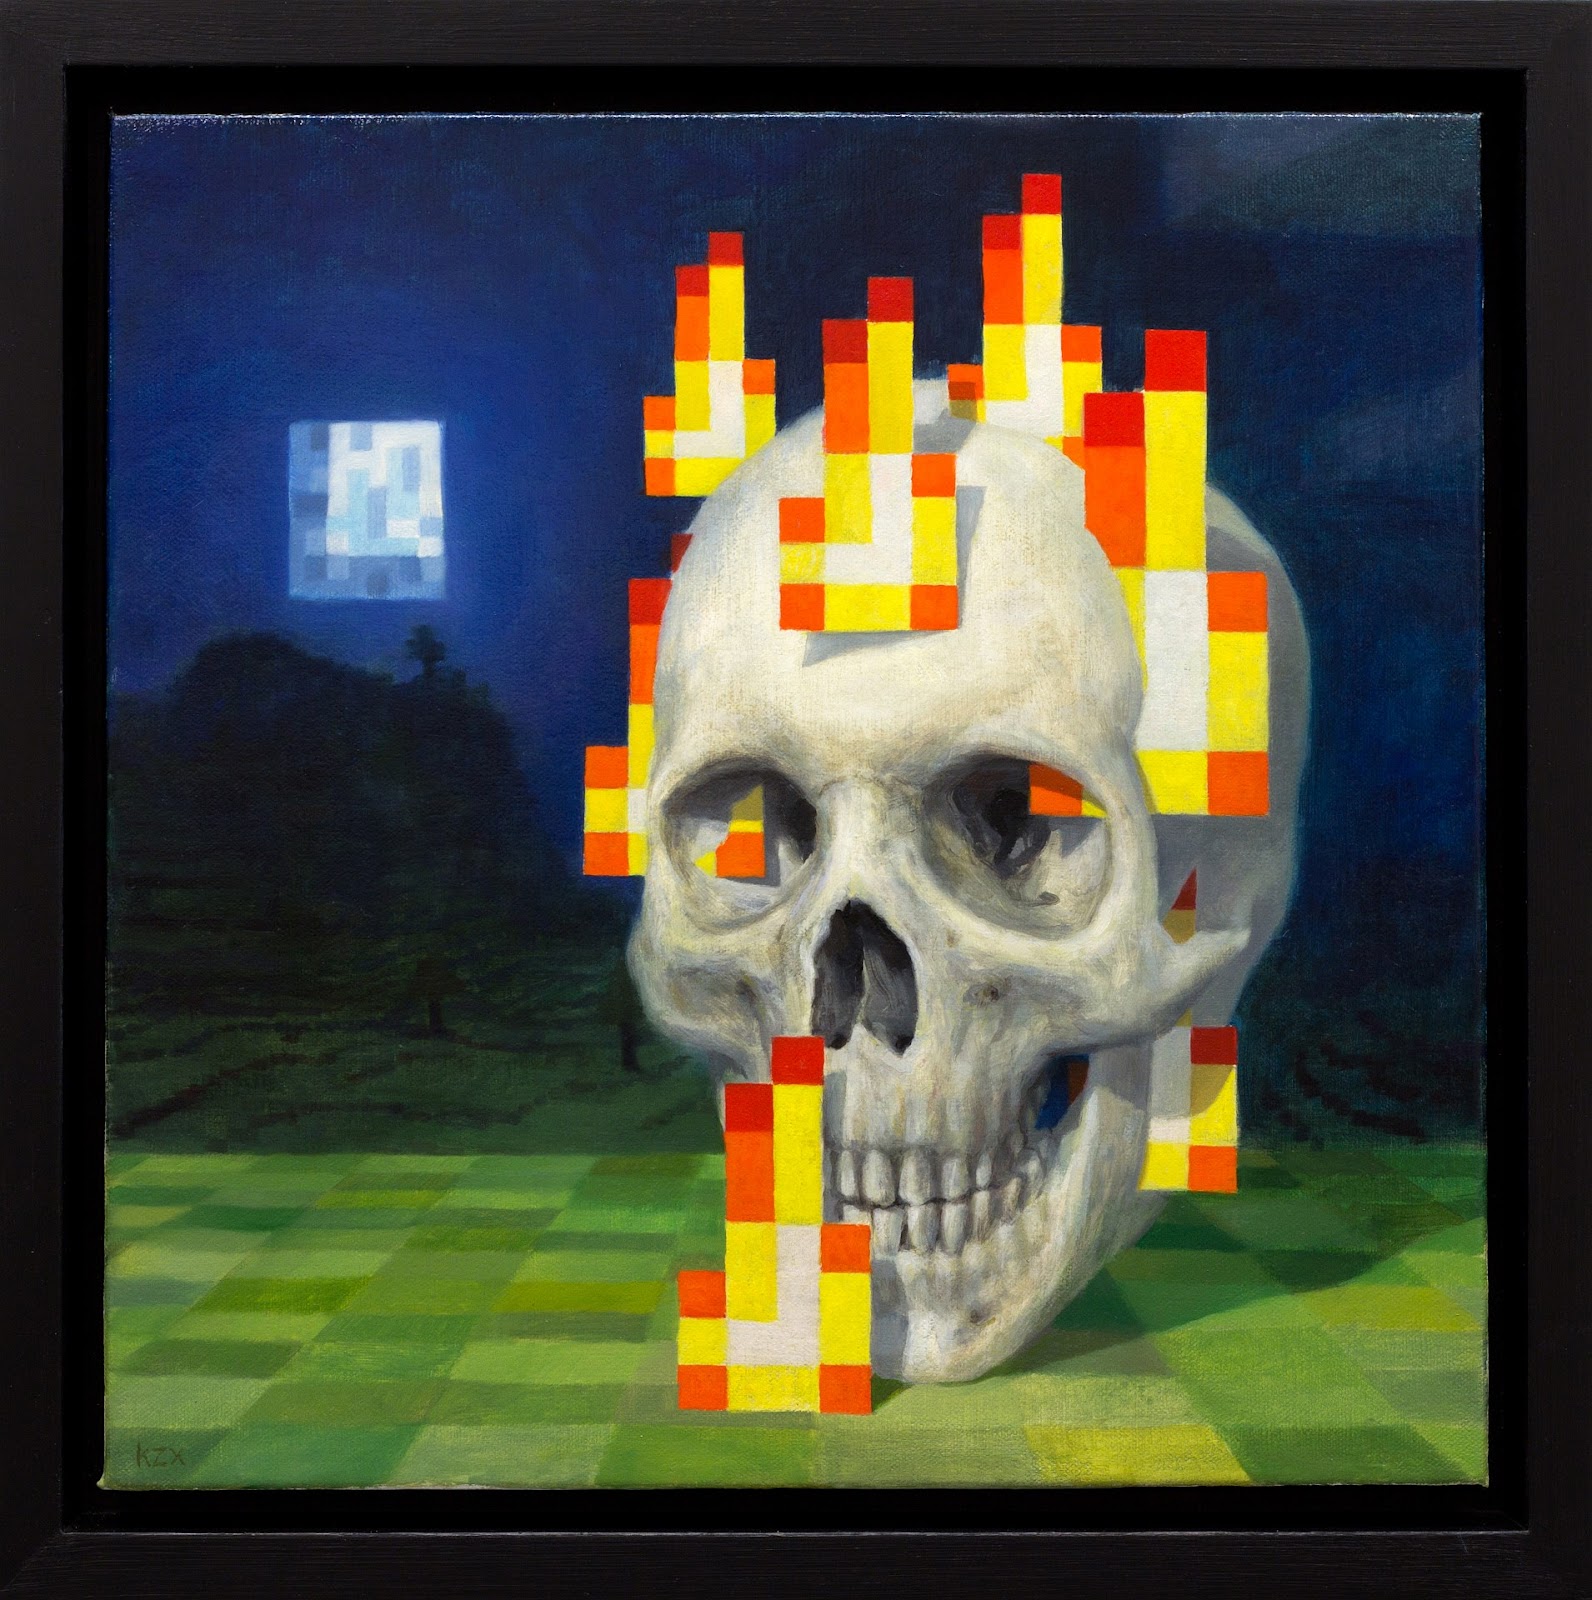
This can be found on Kristoffer Zetterstrand's site here: https://zetterstrand.com/eventz/wp-content/uploads/skull_on_fire_framed_c_1910.jpg
You probably couldn't really tell if there was a real Minecraft world from the in-game painting, but looking at this original version, you can see pretty clearly that it indeed is a Minecraft world. You might still doubt if it's an actual generated world, or if it was just something he randomly painted, but we'll get to that later. Spoiler: yes it's a real world.
Kristoffer Zetterstrand
Kristoffer is a Swedish abstract artist. His works are influenced by both classical and renaissance artwork, as well as computer graphics and 3D modeling.
His website: https://zetterstrand.com/
He was a friend of Notch long before Minecraft was a thing. Notch decided he wanted to include his paintings in Minecraft, so he let Kristoffer downscale them (and edit some of them a little bit to still look good inside the game) and put them in the game.
How the project began
Suggestion
At first, it was just an idea that I suggested in the #suggestions channel on our Minecraft@Home discord server.
It seemed to catch on, as at the time of writing, it's the most upvoted (stars) suggestion on there. The main motivation for this idea was the fact that it's the last legendary piece of the "Minecraft screenshots included inside Minecraft" trilogy (alongside pack.png & the original title screen background panorama), at least for the Java Edition, that is. There have been some other things added later, such as the custom world preset icons, or the newer panoramas, but those are not as significant. (We might still try finding them later tho.)
Reaching out
Looking just at the painting, it would be practically impossible to get the correct perspective and block placements, since it's a hand-made painting, not a direct screenshot. We couldn't even know if the blocks are painted exactly as they've been generated, that is, if it even was a real seed in the first place. And even then, there probably isn't enough info to go by.
That's why I decided to reach out to Kristoffer and ask him for more details about the painting. Not sure why, but at first, I wrote a comment to him on Youtube, which despite being kinda stupid in hindsight, he actually replied to after about 2 weeks and told me to contact him via email (which is what I probably should've done in the first place lol). Anyway, I then talked to him over email, to which he replied on August 21st 2020, and we got really lucky, because he actually still had the original screenshot! This was never shared publicly before, but now you can get it here: https://imgur.com/HVhrbnH

Unfortunately, it's not the raw original screenshot of the full Minecraft window. It's been cropped, the crosshair was edited out, and it's also a jpeg, so the quality is quite bad, but it was still good enough to work with.
With it, the project became more than viable and we started poking around with it right away after his initial reply. I also asked him a few more follow-up questions, to which he also replied a few days later. This got us a bit more info (for example his monitor resolution being 1920x1200, etc.) to base our assumptions upon.
He also shared some other things with us, including some old world files he found from around the same date, but unfortunately, it wasn't the correct world. I checked from X=-8000 to X=8000 on 3 separate Z alignments (based on the clouds), and I didn't find the place (and there's basically 0 chance it's further away than that). If you still want to check that world out yourself, here's the seed: -3791674045461205272 (needs to be used in Alpha 1.1.2_01 or earlier).
Also here's one more image that he sent that wasn't ever publicly shared before:
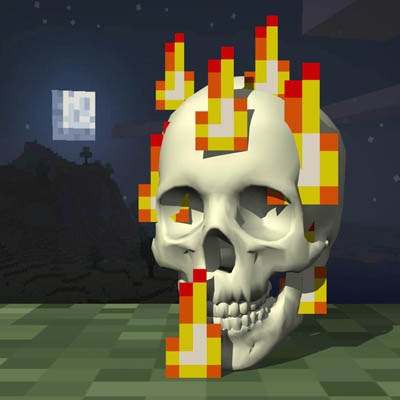
It doesn't really help us, but it's cool to see the original 3D sketch he used.
What we found out
About the screenshot file
How & when it was made
It's not an actual in-game (F2) screenshot, since that wasn't yet possible in this version. At first, he took a manual desktop screenshot of his maximized Minecraft window using Picasa, which saved it into a raw bitmap file named "Fullskärmsinfangning 2010-10-12 132249.bmp". He sadly doesn't have this original raw file anymore, but at least it tells us the exact date & time when the screenshot was taken, which is October 12th 2010 at 13:22:49 (UTC+2). He then opened this file in Adobe Photoshop CS2 (Windows), cropped it (but not rescaled) and edited out the crosshair (there are still some leftover artifacts though) and saved the image in a jpeg format with these settings:
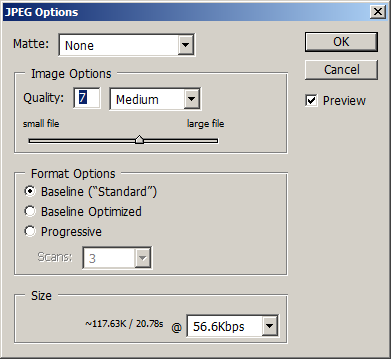
This produced the actual screenshot that he gave us.
Metadata
Here's all the metadata that can be extracted from this image: http://fotoforensics.com/analysis.php?id=cf7716e80530f991ccf01f89c546f74fe1ae1b59.101733&show=meta
Reproducing the same jpeg
To be able to get an accurate overlay & train a jpeg-denoising AI, we needed to be able to reproduce the same jpeg settings as seen in the original screenshot. The Photoshop settings shown above do the job, but it would be impractical to manually use Photoshop for every image. That's why we needed to figure out how to reproduce it algorithmically.
The way each jpeg image is encoded/compressed depends basically only on the "quantization tables". These can be easily extracted from the image file.
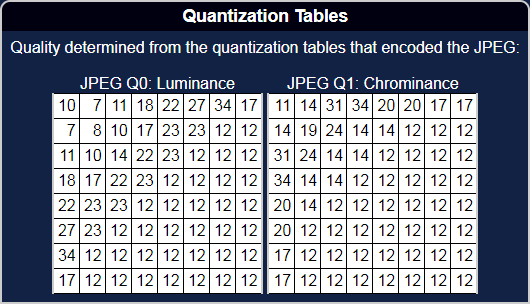
You can grab these from here: http://fotoforensics.com/analysis.php?id=cf7716e80530f991ccf01f89c546f74fe1ae1b59.101733&show=estq
With the jpeg algorithm implemented, reproducing the jpeg is easy. You basically just need to plug these values in.
Minecraft version
Based on the date of the screenshot (October 12th 2010), the latest version at that time was version Alpha 1.1.2_01 (released on September 23th 2010), which gives us an upper bound.
The lower bound can be assumed from a different screenshot that Kristoffer shared with us, taken on August 3rd 2010 (2 months before the painting screenshot).
https://i.imgur.com/rHTkbCE.png
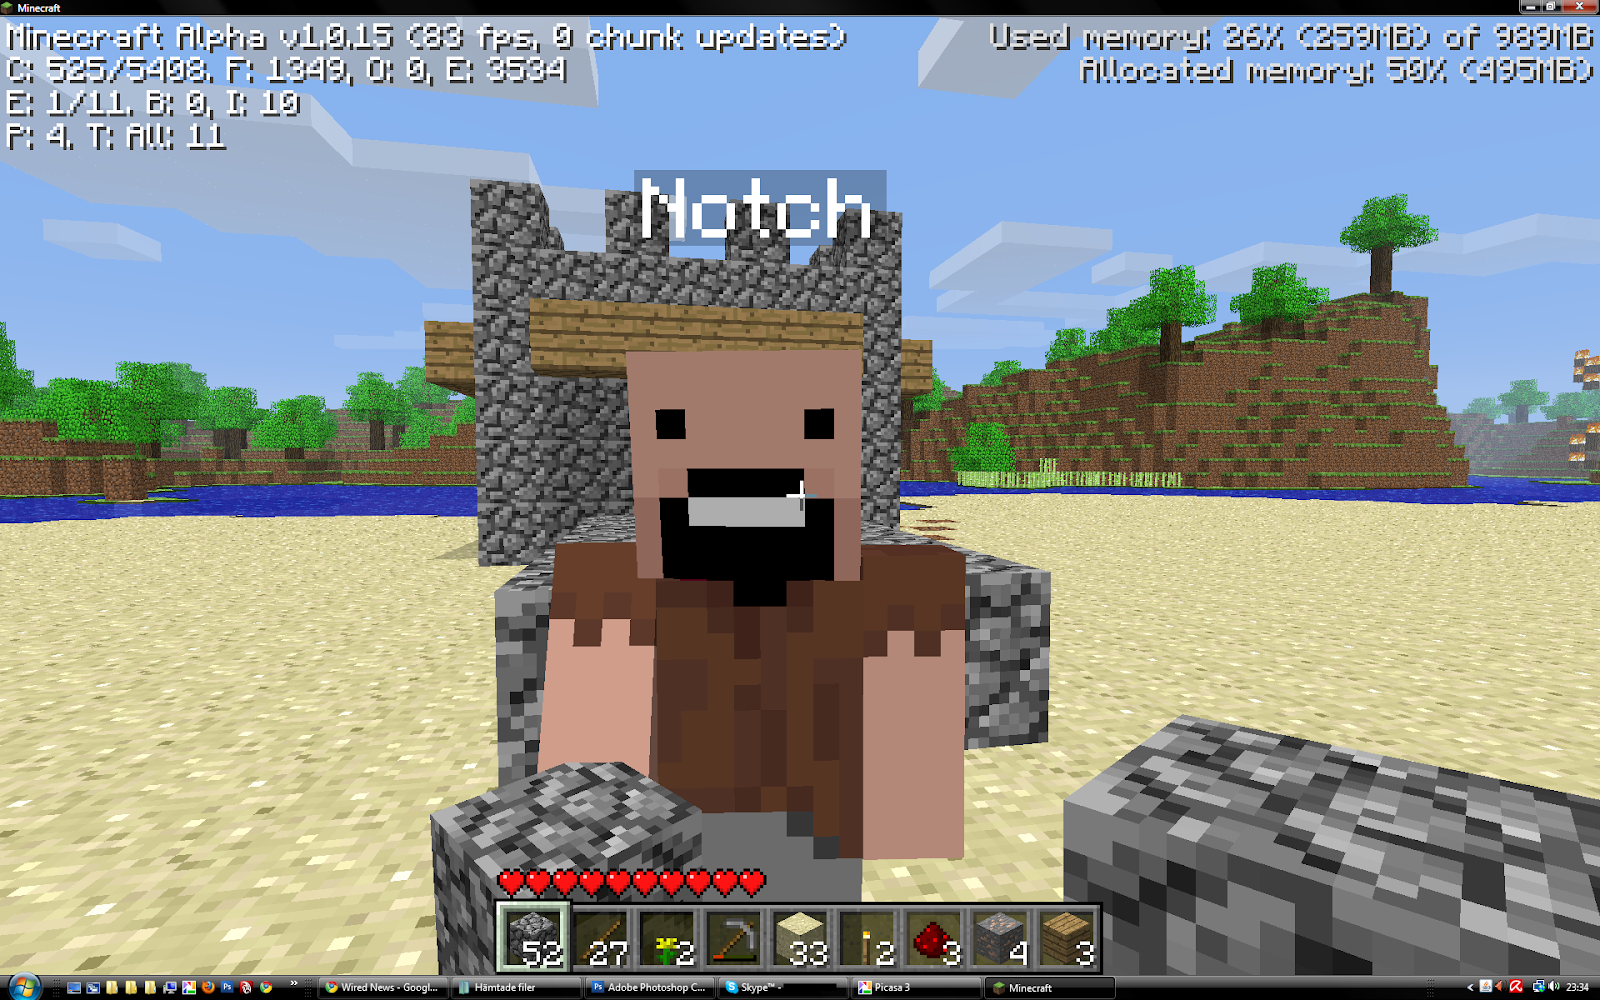
It shows him testing multiplayer mode with Notch in Minecraft Alpha 1.0.15 on the day of that version's release. It would be extremely unlikely that he would go back to an even older version after 2 months. There wasn't even any way to select versions at that time, so it would've had to be done manually somehow.
There is no visual way to tell which version was used, since all the versions in the considered range looked basically identical (at least regarding the content visible in the screenshot itself). At the same time though, most of the code under the hood (or at least the relevant parts) is also the same, so it's safe to pick any version in that range.
Since at the time the screenshot was taken, the latest version was already out for a few weeks, it's reasonable to assume that that's the version Kristoffer was using, so it's the version we'll be working with.
https://minecraft.gamepedia.com/Java_Edition_Alpha_v1.1.2_01
Also this version is the oldest one for which MCP exists, so it's the easiest to work with.
There are a few things to keep in mind regarding this version:
- It's the last version before biomes were introduced into the game. This means that all of the grass and leaves (also the sky) have the same color everywhere.
- It also uses an older terrain generator than the one used in later Alpha/Beta versions.
- The leaf decay is broken, so leaves can randomly decay even if they are still part of a tree. This means that we can't really depend on leaf placements, or at least not on the ones we don't see, only on the ones we still do.
- This version doesn't have flying, custom seed selection, F1 (hide GUI), F2 (take screenshot) or even GUI scale setting (the GUI can still scale automatically depending on the resolution though).
- The FOV cannot be changed. It's always set to the default, which is 70.
- Animal spawning is random, it doesn't depend on the seed.
- The lighting is much simpler than in modern versions.
The screenshot image
Window resolution
Since you couldn't hide the GUI in this version with F1 and Minecraft couldn't take screenshots with F2 yet, the screenshot has been taken manually in desktop mode with all of the GUI elements still present. The hotbar at the bottom and the version name at the top have been cropped out and the crosshair has been edited out (there's still some visible artifacts from it). Since default print-screening doesn't work in full-screen (F11) mode, it also had to have been taken while Minecraft was in windowed mode. (This might not be a relevant argument, since the screenshot was taken using Picasa, but it's true nonetheless.)
The resolution of the cropped screenshot we have is 1602x971. We tried to figure out the original resolution ourselves at first, but we wrongly concluded that his monitor was 2048x1152. He later said his monitor resolution was actually 1920x1200 and he also said that he used Windows 7 at that time, which helped us to determine the exact full window size by subtracting the top and bottom panels (his bottom panel must've been set to a smaller size than default btw), which got us the actual resolution: 1920x1148.
We were uncertain if this is the actual resolution though, because in the other screenshot he sent us (the unrelated one with Notch https://i.imgur.com/rHTkbCE.png), he was using Windows Vista and the window resolution there was 1920x1150, which is really close to the other one we got, and it was quite hard to determine which of these it's actually supposed to be. Additionally, we also thought it would be quite a coincidence for him to upgrade to a newer OS in the 2 months between those screenshots, but it seems like that was indeed the case. The reason it was so essential to know precisely which one of these resolutions it was is because unlike the horizontal resolution (which acts almost like cropping), the vertical resolution is linked to the FOV (changing it stretches the whole view), so it plays a major role in replicating the correct perspective alignment later. Since the first resolution (1920x1148) seemed to match better (and it continued to do so even more after we figured other stuff later), it's the one we proclaimed to be the correct one.
Cropping
Knowing exactly how the image was cropped was also essential for getting a perfect perspective alignment. We were able to figure out the position of the cropped rectangle by matching the shape of the player's hand in the picture with our own pictures taken at the full 1920x1148 resolution, since the size & shape of the hand depends only on the vertical resolution and it's always drawn the same way when standing still (except for shading of course). It was a bit hard to match the hand with so much jpeg artifacting present, but we confirmed it with multiple jpeg denoisers and also by replicating the same jpeg settings for our own screenshot, and we independently got the exact same cropping rectangle every time, so we're pretty confident about it. Here's how it looks like overlayed over what would be the original full game window:
Also notice, how the cropping intentionally leaves out the hearts, hotbar and version name.
This gives us the cropping origin coords 138;48 (top-left corner of the cropping rectangle).
The size of the cropping rectangle is of course the actual 1602x971 screenshot we have.
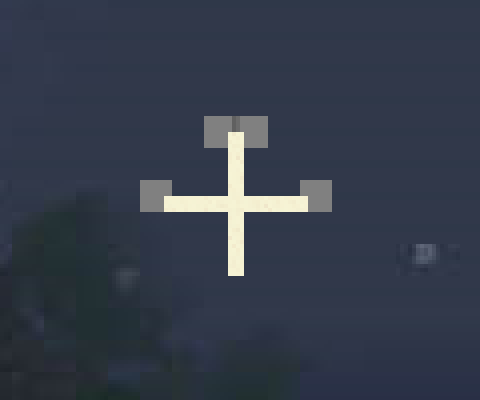
Crosshair
As mentioned before, the crosshair had to be edited out of the image, because there was no way to hide the GUI (no F1). This wasn't done precisely enough though, as you can still find some leftover artifacts in the image from the corners of the crosshair.
Original: (nearly invisible)

Brightened:
Highlighted + actual crosshair overlayed in the correct position:
Vignette
Before Kristoffer told us his original monitor resolution, we tried to figure it & the center of the screen ourselves. For this I tried using the vignette overlay that's present on fancy graphics and visible in the screenshot.
The vignette is a transparent screen overlay that gets darker towards the edges and it's size depends on the light level the player is standing in.
This is the vignette.png file from the game:

This is not what's overlayed on the screen though. It's just an alpha-map, with black meaning completely transparent and white meaning opaque.
Here's how it actually looks:

And here's how it looks manually mapped over a white background at the correct resolution:

So, since the vignette is a circular texture that is stretched to match the aspect ratio, the width/height ratio of any given concentric ellipse is the same as the aspect ratio of the original Minecraft window.
Here's the original screenshot with higher contrast (so you can see the vignette color banding) and some marked ellipses:
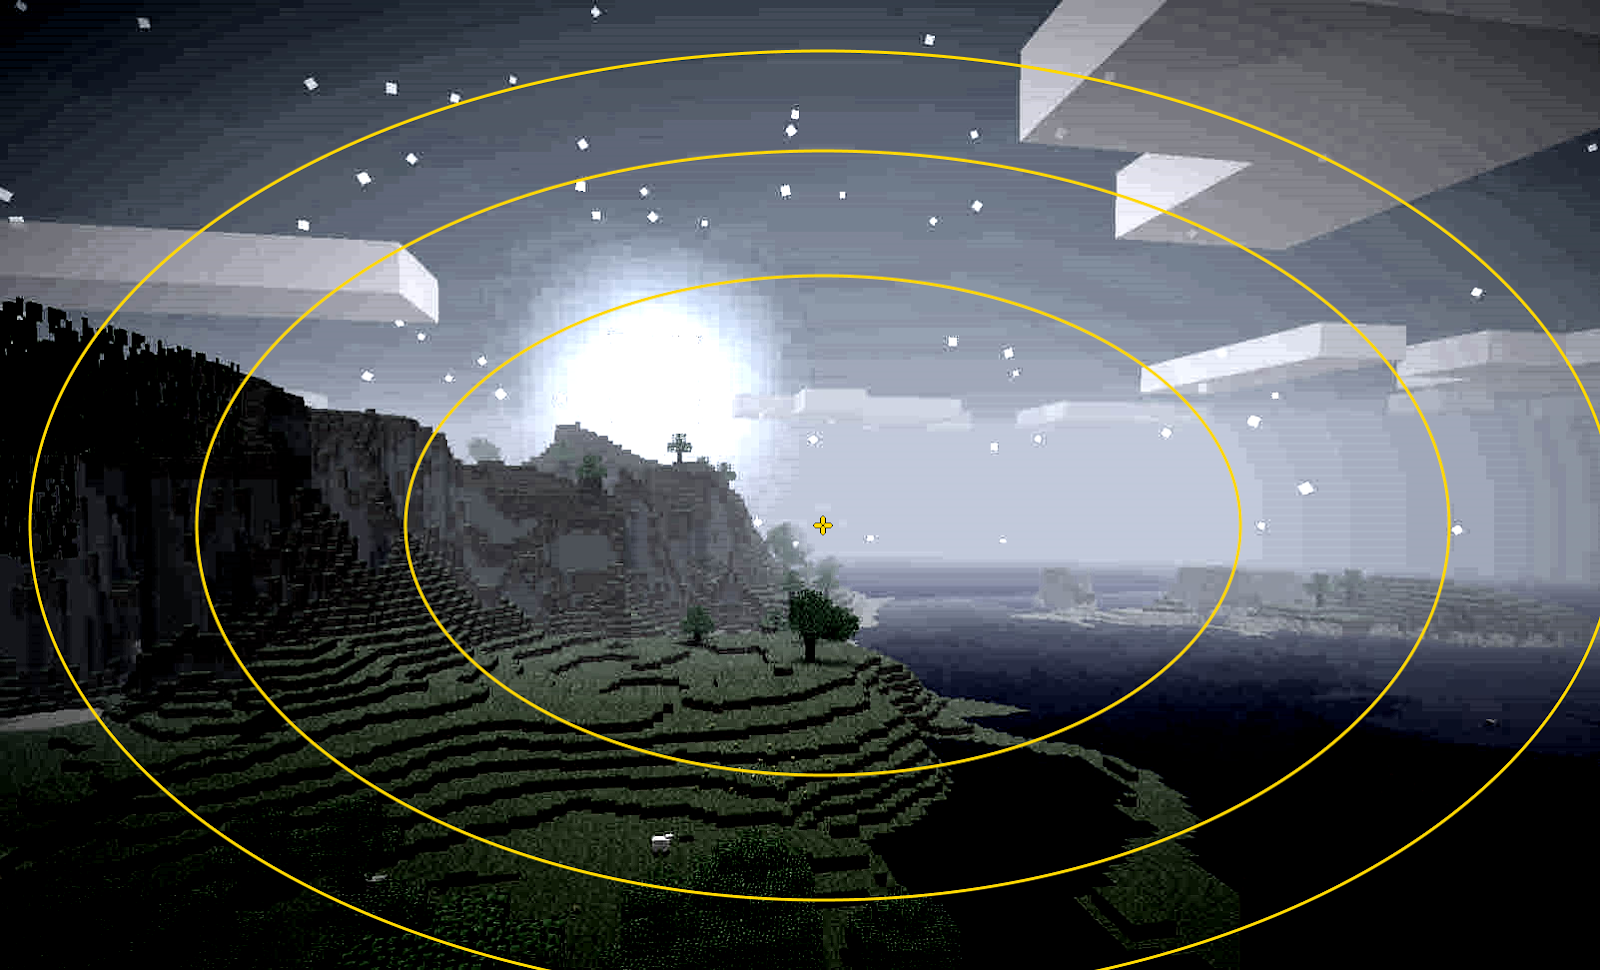
(This image was made after the resolution was already figured out, that's why it now matches perfectly.)
It did roughly give us the aspect ratio, but it was only approximate and it would've probably been really hard to get it any better this way. What it did help with however, is finding roughly the screen center & crosshair before we were able to match the hand accurately. This is how I noticed the crosshair leftovers for the first time actually.
The world on the screenshot
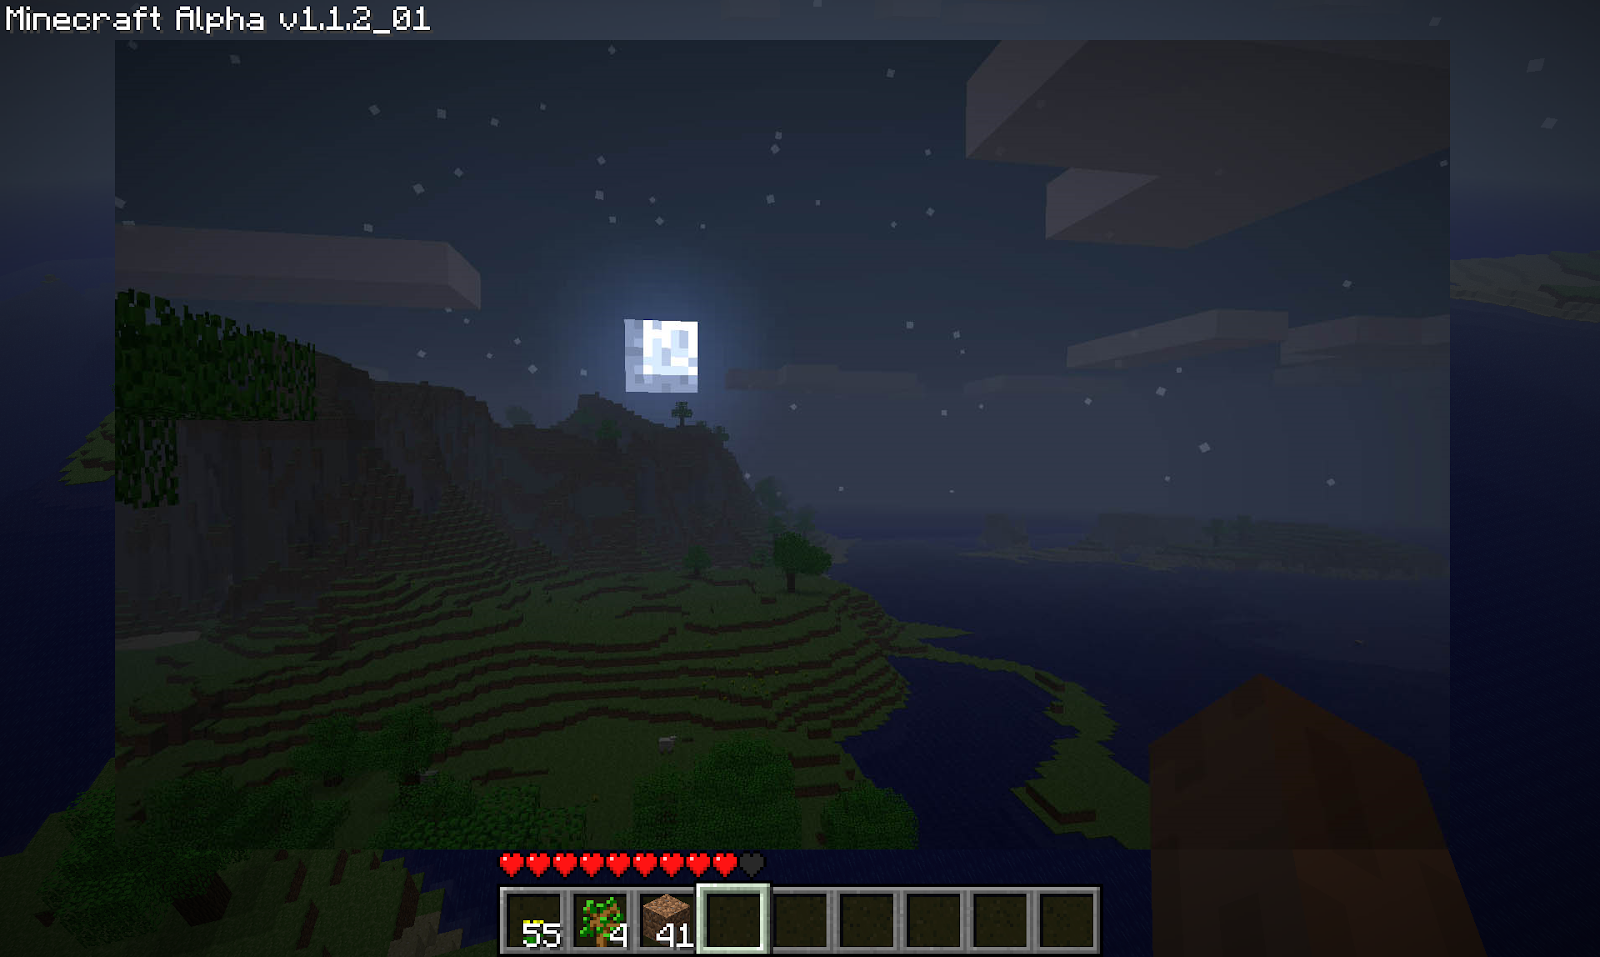
Moon orientation
The orientation of the moon was the first thing that was used to figure out the facing direction. This would've been possible by other means, like block shading, texture orientation on block tops, or clouds, but the moon was the easiest way and it made locating the correct cloud patterns a lot easier.
The player is facing north (towards -Z), since the moon isn't upside-down. That also means that it's rising, not setting, so it's early night.
Here's how the moon looks like while rising on the north:

(This is our case)
Here's how it would look like if it was instead setting on the south:

Clouds -> Z coordinate
As with any seedfinding project, the cloud patterns are the most useful & straight-forward way for figuring out the Z coordinate, so that's what I did here too. Here is the location of the visible cloud patterns marked on the full cloud texture, as well as other cloud-related info:
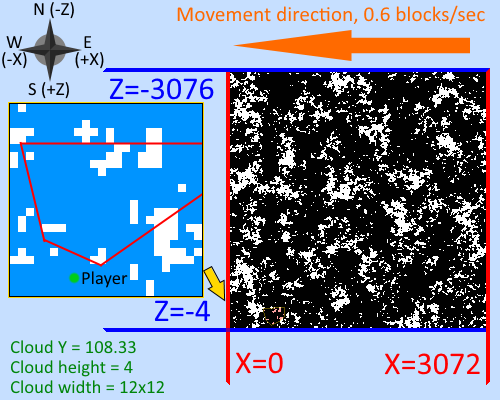
Based on this, we know that the player is standing at Z=-29.04 facing north (towards -Z).
Additionally, since Kristoffer said that he thinks it was a random world he intentionally created just to get a nice screenshot of the moon and that he really doesn't think he would've walked too far (mostly just waiting for the night), it's safe to assume that the position is near spawn and not on a separate Z alignment 3072 blocks away, where the clouds would wrap around again.
In-game time
At first, a rough time estimate has been made using the light level, which was determined to be 7 (8 "darkenings" from full daylight). This light level coresponds to a time range 13188-13347 ticks (tick is a 1/20 of a second).
Later when we got the correct perspective alignment, we were able to get the precise time by lining up the player at night and comparing the moon angle to the one in the screenshot. This got us the actual time: 13249 ticks.
To be even more precise, the time is near the very end of the 13249th tick, almost 13250.
As I've already mentioned in the moon orientation section, this coresponds to it being an early night, it's not fully a night yet.
X coordinate fail
It's possible to figure out the exact X coordinate using the exact world time and the cloud offset, but only if both of these conditions are satisfied:
- The world must be freshly generated (not loaded)
- The world must be the only world that has been opened since the game was launched
At first, we assumed this to be the case with the painting screenshot, as it was also what Kristoffer himself assumed when asked about it. However, as we worked under these assumptions to figure out the X coordinate, we discovered that this unfortunately isn't the case, as the clouds and moon didn't match at the exact same time at the same place as they should've. The error was quite small, only 4 ticks of difference, but it was confirmed with very good precision that this is indeed the case, and so we couldn't depend on this X coordinate to be valid.
Here's the FLAWED ATTEMPT and the WRONG X coordinate we thought we found before we spotted this error:
After we found the correct perspective (camera position and rotation), we were able to get the actual time accurately by matching the moon angle in the picture. The time is 13246 ticks (20 ticks is 1 second).
We then rewound the clouds by this amount of time and moved the player (that was already standing at the correct relative fractional position) to the correct integer X coordinate to get the cloud patterns to match. This not only revealed that the X coordinate is 90.45, it also confirmed that the time is correct, because otherwise the clouds wouldn't match exactly by moving just the integer part of the coordinate (since the fractional part was already fixed by the perspective relative to the blocks).
Points of interest
Flowers
The most valuable thing is the big flower patch in the middle of the valley (A).
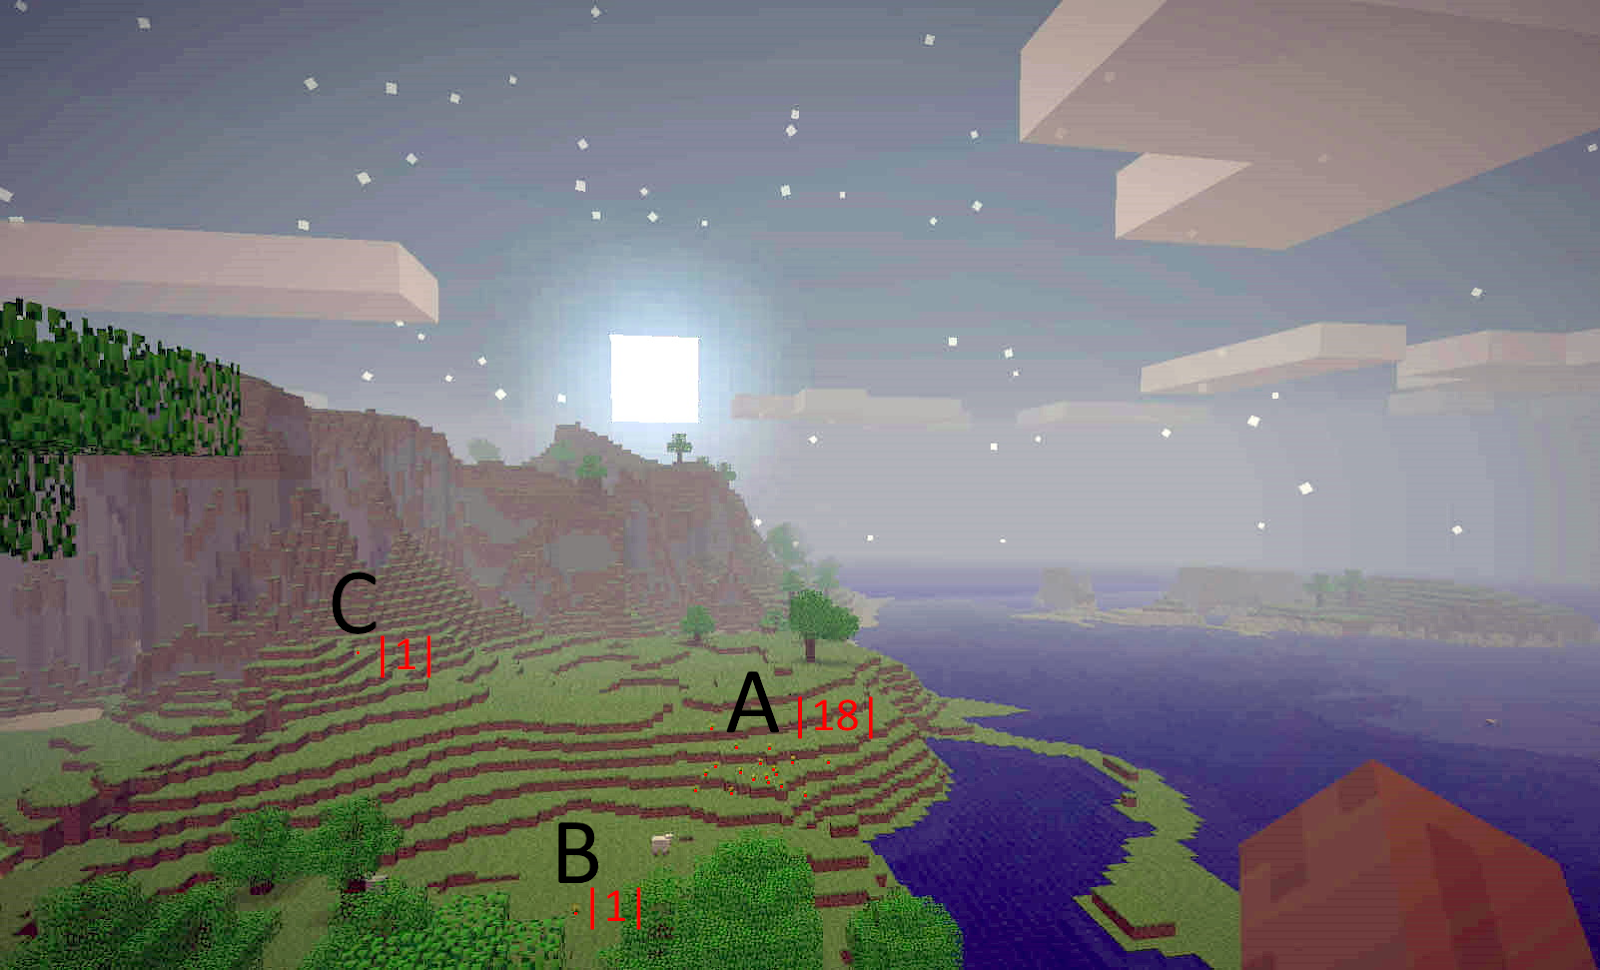
(Each flower is marked with a small red dot.)
There are 18 flowers in that patch. There's also 2 more flower patches visible (B, C), but there's only 1 flower visible in each one of those.
The big patch (A) was from the start considered to be the main feature that's gonna get used to crack the seed. At first, we thought this would've been quite easy, since we thought we knew the full coordinates, but a search done at those coordinates didn't find this flower patch, so we knew that either the coords are wrong (which was the case), or it's not just one flower patch, but two of them intersecting (which wasn't as uncommon as we thought at first, but it wasn't the case here).
Read more about how the flower generation algorithm was reversed (and used to find the seed) near the bottom of the document.
Dirt heights
The other thing that was gonna help us find/confirm the coordinates was the dirt heights, but even though there's a lot of dirt-to-stone borders visible, it was found that there's barely any (if any at all) "dirt anomalies".
The dirt thickness at each location is partially based on the seed, but partially also just based on it's world coordinates, so using sort of a statistical analysis, we can determine the most likely X/Z coordinate, roughly speaking.
Trees
The trees would've been of interest if there wasn't already a better way (using the flowers)., Also we can't really depend on the leaves, because all the leaves randomly decayed in this version, even while still being part of a tree.
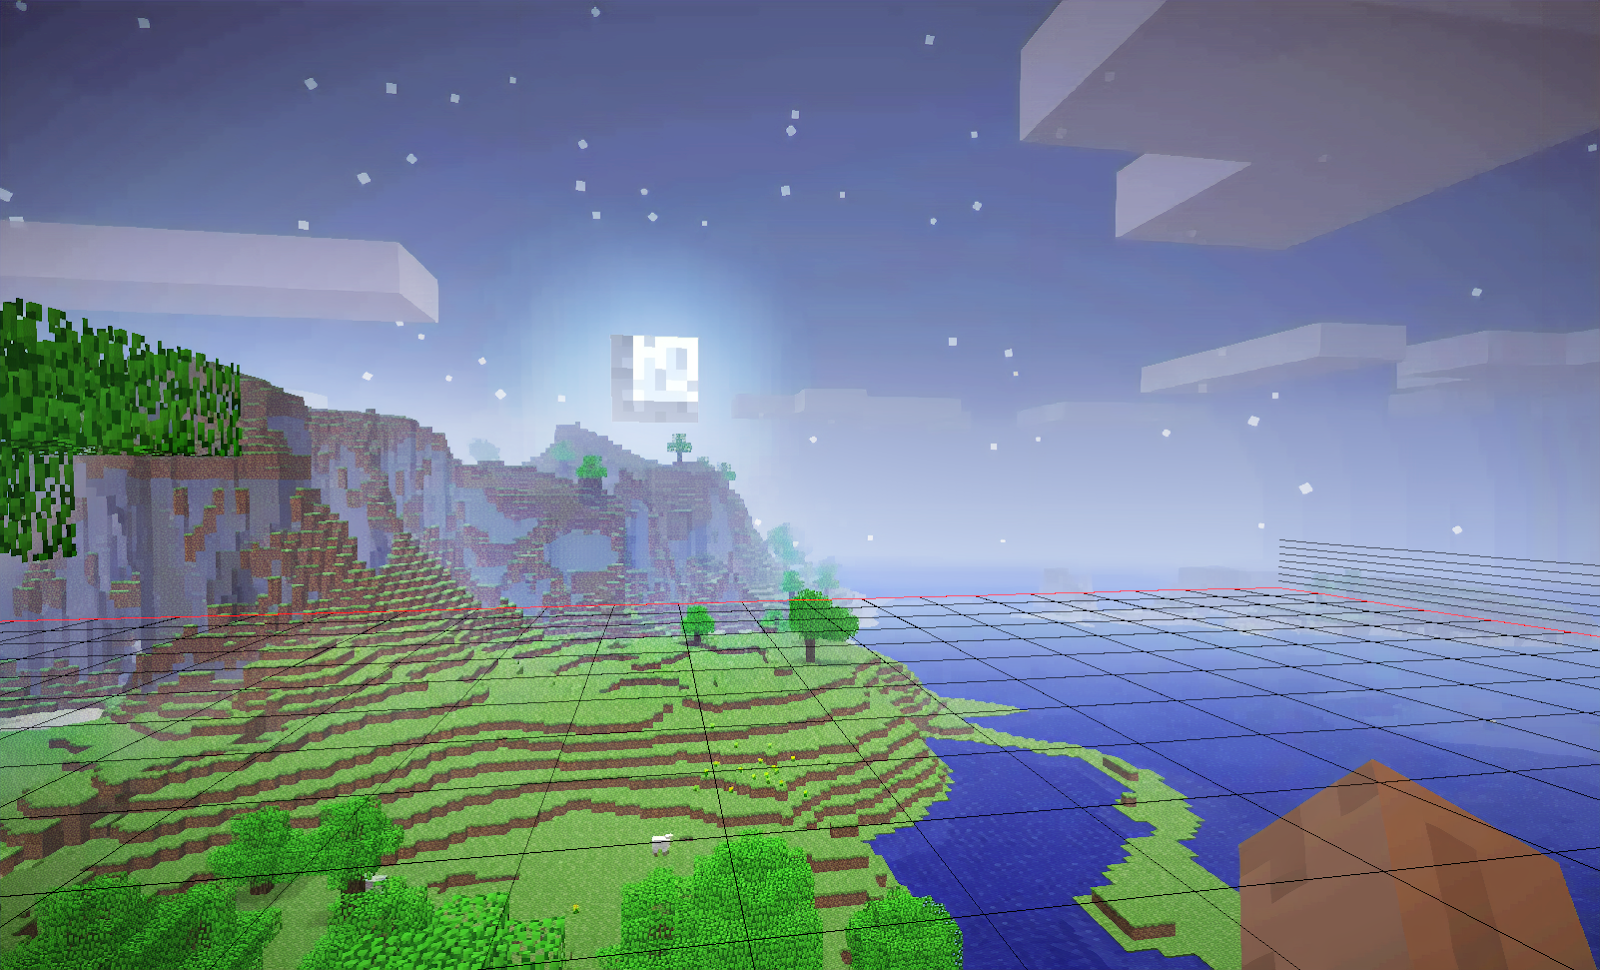
Render distance chunk borders
You can spot the edge of the rendered chunks on the far right side, which we can use to get the correct chunk alignment after we get a good perspective+overlay. It's only use now that we have the coordinates would be just to confirm them, but the image is probably too blurry to do that (at least not easily).
The only visible render distance chunk border was in the Z direction (forward). The X chunk border on the right that we thought might be there was later confirmed to not be the case, as the chunks around the player get loaded in a square radius in alpha.
Here's a chunk grid overlay (at the water level) as well as other grid lines
rendered by PseudoGravity and composed by Tomlacko:
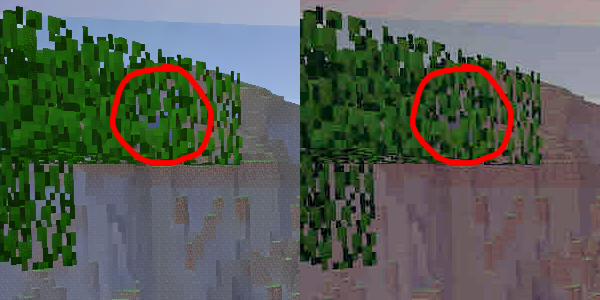
Waterfall
There's possibly is a waterfall behind the leaves, but it's too hard to make out to be of any real use. It might also just be a dark overhang. Nope, it was just an overhang.
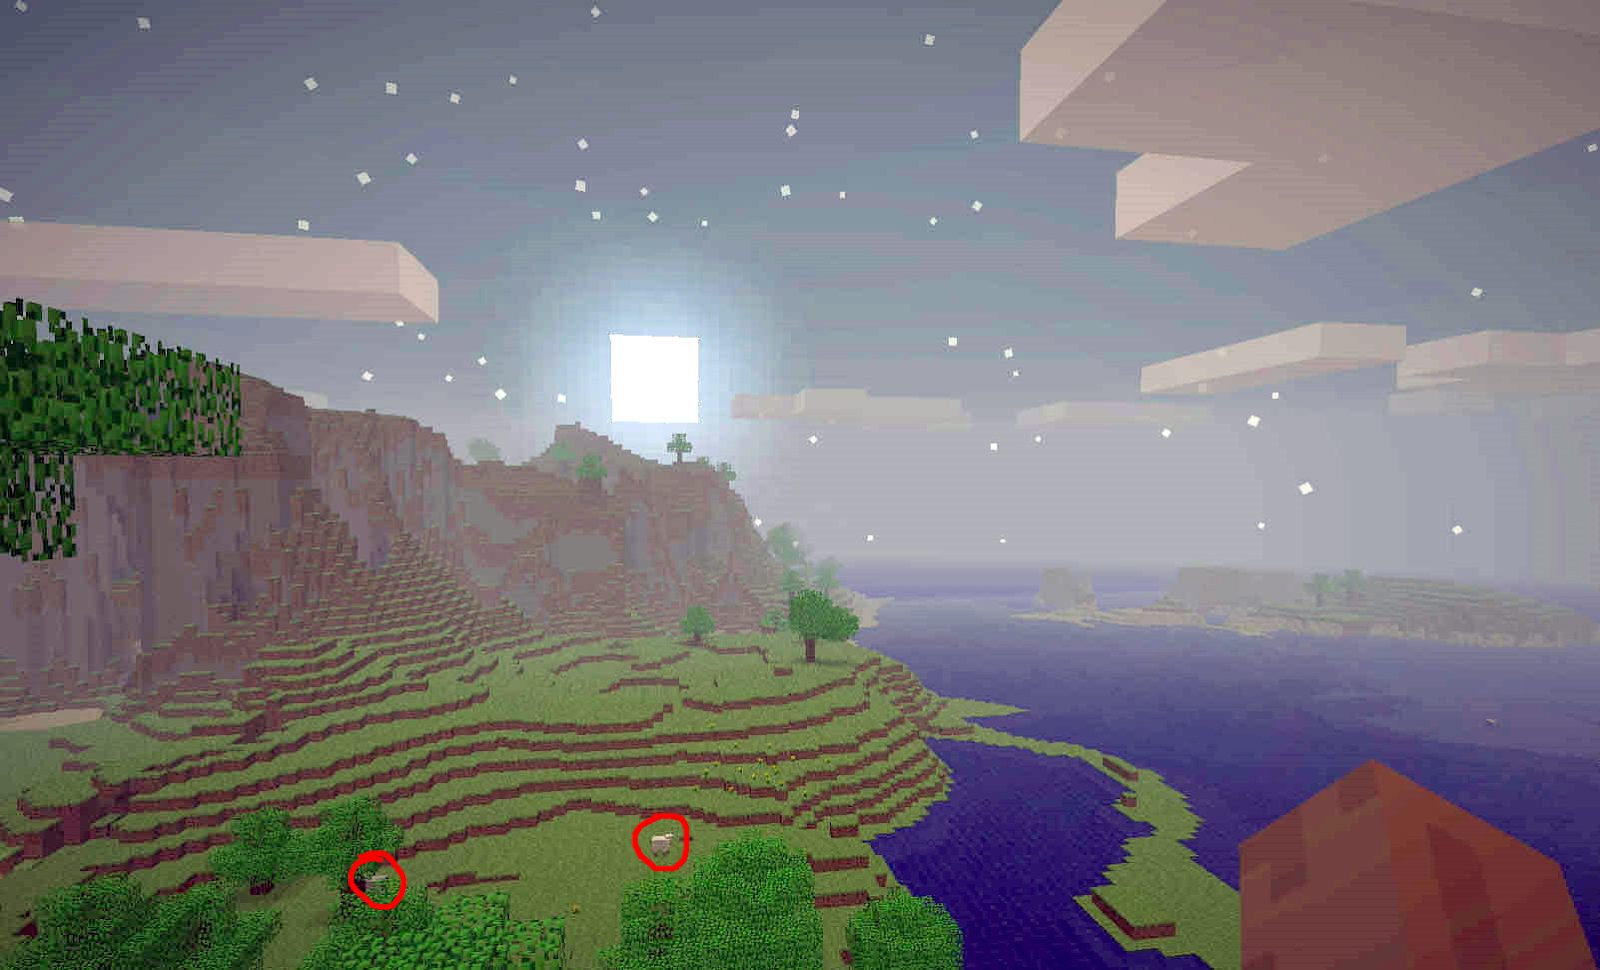
Animals (Sheep)
Even though there are 2 sheep in the picture, mob spawning is not tied to the seed in these old versions, so this is useless.
What we did/created
Image deJPEGifying with custom AI
Since the screenshot Kristoffer shared with us was a JPEG with very low quality, we wanted to try making stuff a bit clearer to see.
With the help of Kay#5495 (who was able to replicate the exact same jpegging) and polymetric#4733 (who created a dataset of training screenshots), Joey#4305 was able to train an AI de-jpegger, which worked out really great and provided a lot of additional clarity to the image.
Here's Joey's writeup on his whole process and the exact things he used/did:
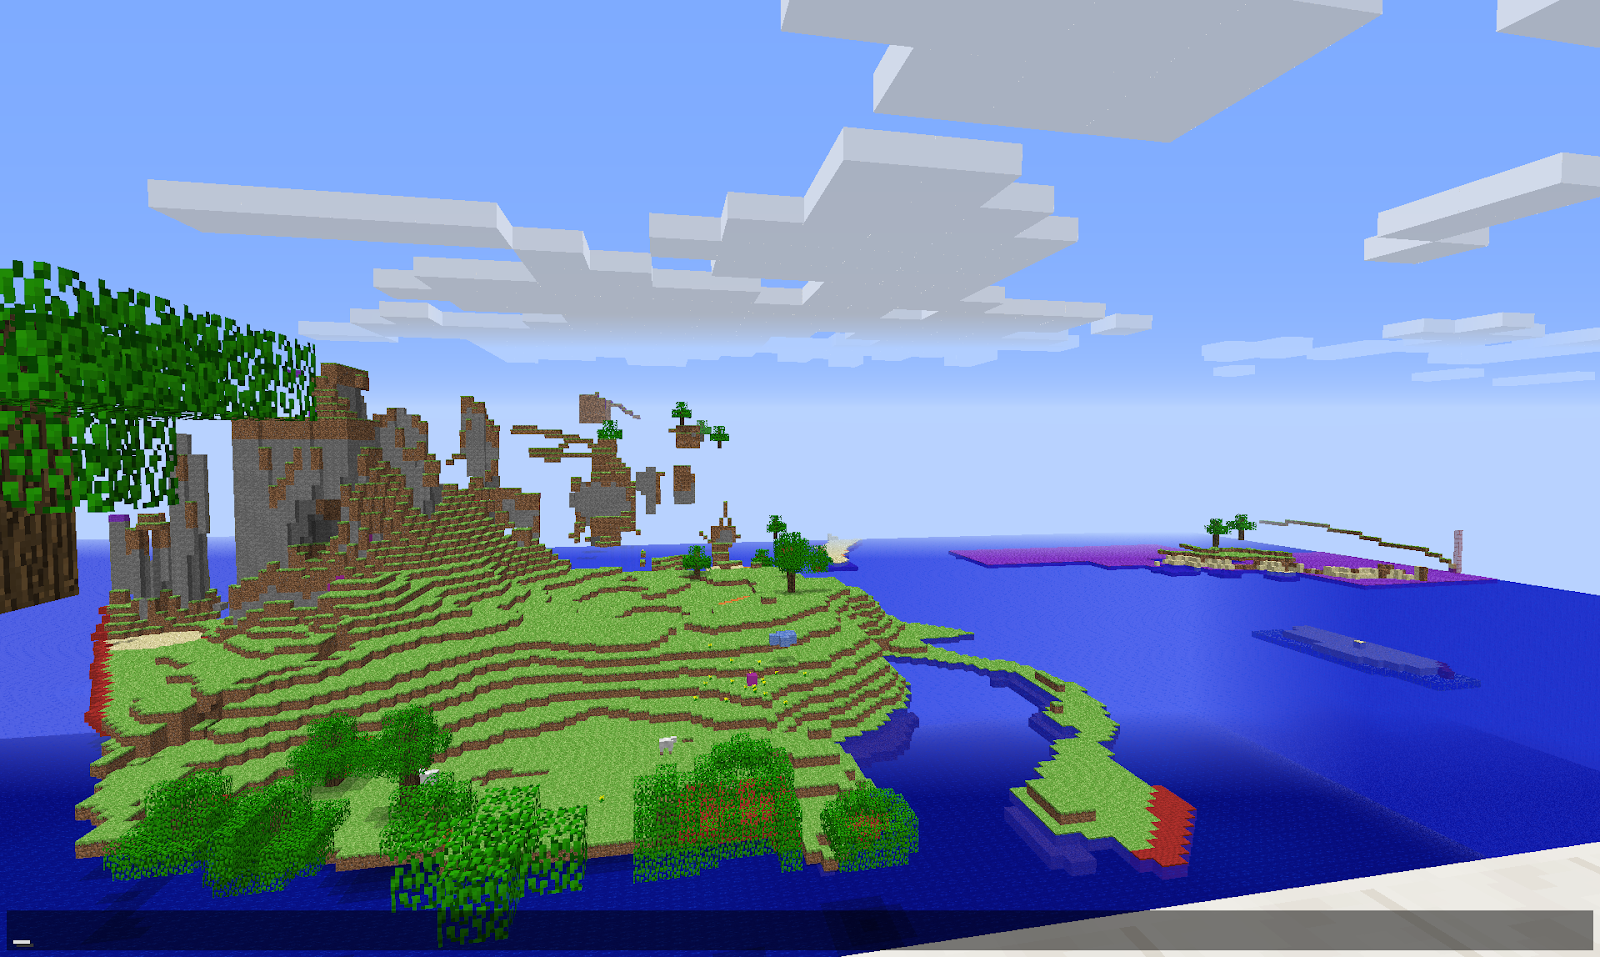
Recreation
As with all the previous projects, making an accurate block-for-block recreation of the world seen in the image is one of the first things on our to-do list. Philipp_DE#1337 set up a server, where everyone (at first) could join and help out. But while getting as many people to work on it makes it go faster, it also leads to allowing unskilled people to make mistakes. That's why we always switch our recreations to "trusted members only" mode right when the recreations starts to reach a "good enough" state. After that, any imprecisions or necessary adjustments can be made by any of our trusted+ members, which works out great.
Having a recreation also makes figuring out coordinates of blocks easier, as you don't have to count them manually on the image.
Interactive overlay & screenshotting bot (+3D renderer)
To build a precise recreation, we needed to be able to experiment with / confirm many hard to recognize blocks that are either hard or close to impossible to judge just by eye. That's why, just like with the previous projects, Tomlacko#2976 created an interactive overlay website, that (apart from other things) was used to overlay a live feed of screenshots taken by Phillip's bot ("N00bBot") every 5 seconds over the original background image.
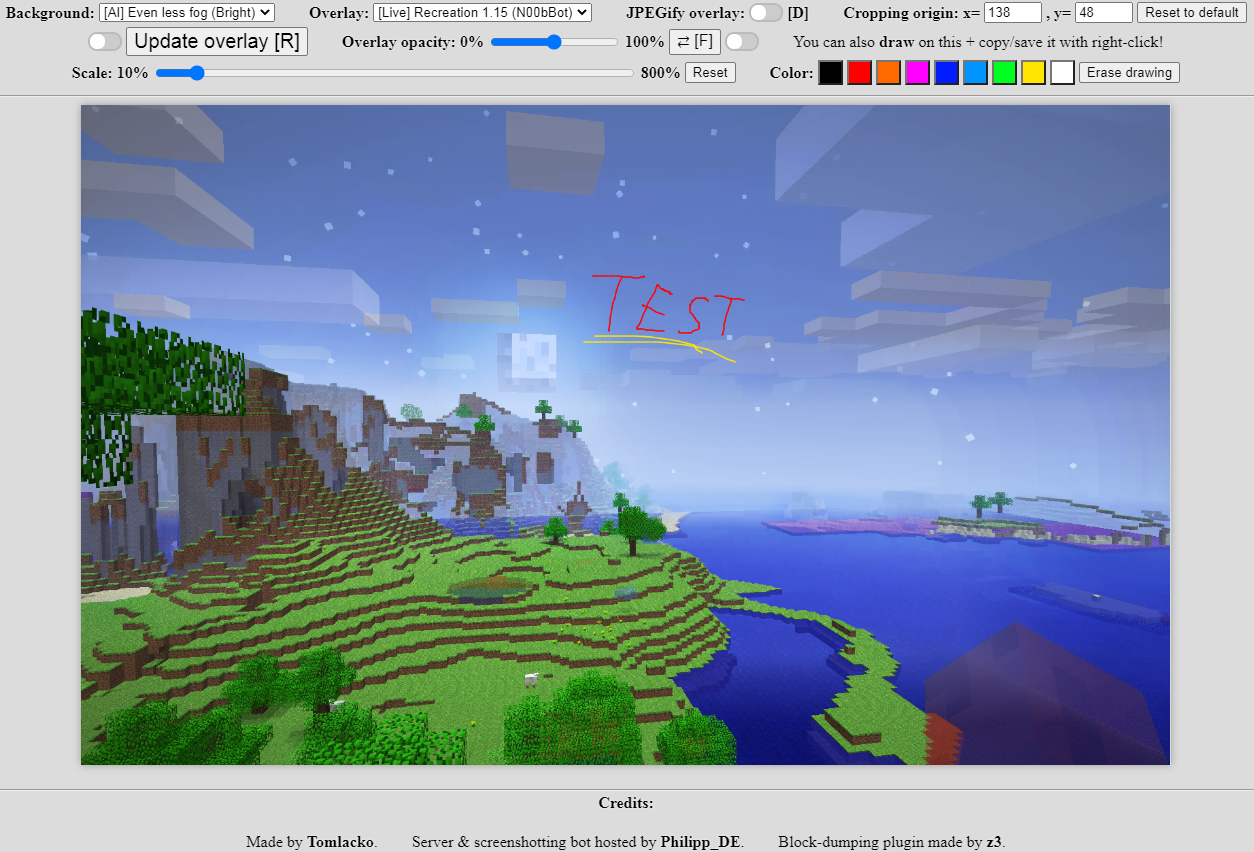
This overlay supports a lot of features. You can switch between multiple backgrounds (original, brightened, AI de-jpegs, etc.), enable JPEGifying on-the-fly, you can change how the image is cropped, you can flip between 0% and 100% opacity (even automatically on a loop) as well as auto-refresh, you can even draw on it and copy that directly into Discord.
3D renderer in browser & live blockdata stream
Built into the overlay is also a custom 3D renderer (using three.js), that tries to mimic Minecraft Alpha rendering. This allows anyone to tinker with the parameters very easily directly in the overlay and helped out with matching the clouds, for example.

The blocks that are rendered in here are taken directly from the recreation server and dumped onto a URL using a custom-made server plugin made by z3#6123.

(This just used the same code as the pack.png renderer, so it doesn't have nighttime lighting.)
Perspective
At first, we thought we would need to use regression fitting (just like with pack.png) to figure out the exact camera perspective precisely enough, but then polymetric#4733 managed to align the position and camera rotation so extremely well just by manual adjustments, that this wasn't even needed. Here's the values that were figured out:
- X: -249.65~ (only the fractional amount was known until the seed was found)
- Y: 91 (92.62 eye position)
- Z: -29.04~
- Yaw: -168.6
- Pitch: 2.4
An interesting thing to note is that during the pack.png project, we also figured out that while using the default mouse sensitivity, the camera can only rotate in multiples of 0.15 degrees, which helped with figuring out the exact camera rotation here, as it didn't leave much wiggle room.
Flower reversal to get the seed
Research
How yellow flowers are generated in this version of alpha:
- In each population region (like chunks but offset by 8 in X and Z), two “flower centers” are randomly chosen
- For each flower center, 64 flower spawning attempts are made in a 15x7x15 box region centered on that coordinate.
- If the flower coord is valid (an empty space directly above a grass block) then a flower is created
- The vast majority of the time, the spawning attempts occur underground or in midair, meaning no flowers. Usually because the flower center itself is not at surface level.
This flower patch has 18 flowers which is decently above average, there was some debate on whether the flower patch was a single patch or if it could actually be 2 patches next to each other. It turned out to be one.
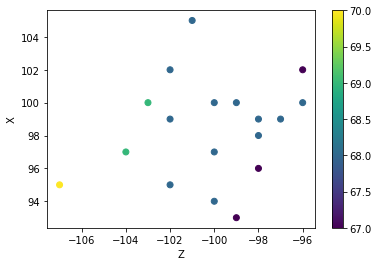
Issue: we know the positions of the 18 flowers, but not the flower center, which the flowers are spawned relative to.
Map of flower positions:
PseudoGravity's method
For a single flower patch, the java RNG is called 384 times (64 flowers * 3 for xyx * 2 per dimension).
PseudoGravity’s approach, which was in the process of being put on boinc, was to do a simple forward search using a circular buffer to store flower positions, which only requires an average of 1 flower to be generated per seed tested rather than 64.
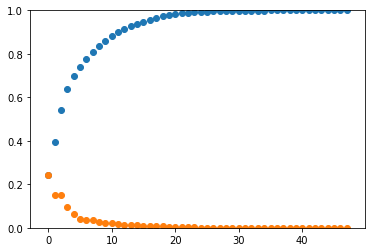
There were 48 possible flower center positions (relative to the flowers).
Statistical analysis gave the following cumulative probabilities for finding the seed after searching each flower center.
Andrew & THE SEED
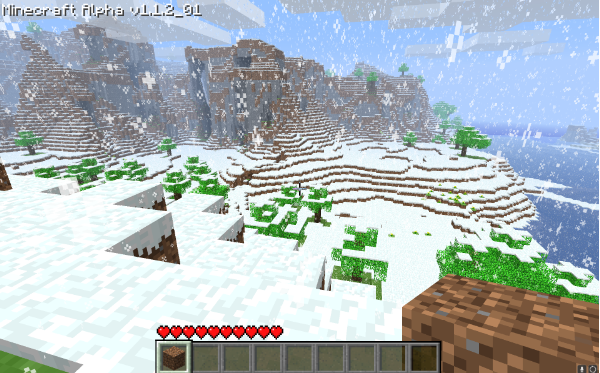
But then, while the code was getting converted to be used on BOINC and distributed, a guy named andrew_555#5879 came along on September 10th 2020 at 4:48PM UTC and nonchalantly shared this screenshot on our Discord, with the caption:
"painting but there's snow everywhere?"
https://discord.com/channels/720723932738486323/747624230505414666/753658068402700509
After a while of complete confusion, panic, and interrogation (lol), he shared the 2 valid seeds of this world that he managed to find basically on his own using his own clever code.
The seeds are: -1044887956651363087 and -6984854390176336655
If you're wondering why it's snowy, that has nothing to do with the seed. In early alpha versions before biomes were introduced, there was a random 25% chance that the generated world would be snowy - it snowed forever, everywhere in the world.
Andrew's method
A statistical analysis (very similar to the one done by PseudoGravity) of the flower patch showed three things:
(1) There was almost certainly only one flower seed that could generate it. In fact, almost all flower patches with at least 12 flowers are one-of-a-kind, so to speak, and are kind of like a fingerprint for the minecraft world they’re in. Since flower patch A had 18 flowers, it was basically guaranteed to correspond to a single seed.
(2) There was a 95% chance that the center of the flower patch was at y=68. So while there were technically 48 possible locations for the center of the flower patch, only the twelve which were at y=68 were tested. The coordinates of the flower patch turned out to be (-242, 68, -100).
(3) It was much more likely to be a single flower patch than two “conjoined” flower patches. Although flower patches with 18 flowers are quite rare, it would be even more unusual for two flower patches of (for example) size 9 to generate right on top of each other.
Since Andrew did not have a supercomputer at his disposal, he had to make his code as optimised and fast as possible. Below are listed four of the most important optimisations implemented in his code. The first two of these had also been employed in a kernel written by Cortex, however his implementation turned out to have a bug. The third and fourth optimizations had never been used before.
- Only test flower patches whose center is y=68 (128x speed increase)
- Only test flower patches whose z-coordinate is correct (16x speed increase)
- Test the 3 possible x-offsets at the same time (3x speed increase)
- Abandon a flower patch test as soon as a flower is placed somewhere where there shouldn’t be a flower (so instead of 64 iterations per patch the average was only 9), resulting in a further 7x speed improvement.
All in all, these four optimizations sped the code up well over 1000 times, allowing a single 1660Ti to check flower seeds at a rate of 36 billion per second. Thus the entire seed-space was searched in under 2½ hours, with a single flower seed (157433031502578) being found.
But because the X coordinate was unknown, he searched from -320 to +320 to get around 80 candidate world seeds, which he filtered down to the correct world seed using a chunk with a big oak tree.
Here's Andrew's code that he used to find the seed:
https://github.com/andrew5555555/painting_kernel/blob/master/kernel.cu
Roadmap
- Contacting Kristoffer, getting the original screenshot
- Setting up a recreation server
- Figuring out the resolution and cropped region
- Making a cleaner image, reducing the jpeg artifacts
- Making a perspective fit to get the exact camera position and angle
- Getting the correct perspective (camera pos+angle) just by manual adjustments
- Setting up an overlay & screenshotting bot
- Figuring out the exact in-game time based on the moon angle
- Rewinding the clouds based on the time passed to get the exact X coordinate
- Building the recreation, getting the exact positions of the flowers
- Bruteforcing the seed (probably just by using the flower patch and then maybe terrain)
- Andrew…?
- PROFIT!!!
Links & Resources
Credits
https://mcatho.me/paintingcredits
Tutorial how to generate the world & take the screenshot + world downloads
Imgur album with all the relevant images
https://imgur.com/a/Fpgxx3n
Andrew's code that found the seed
https://github.com/andrew5555555/painting_kernel/blob/master/kernel.cu
Screenshot metadata
http://fotoforensics.com/analysis.php?id=cf7716e80530f991ccf01f89c546f74fe1ae1b59.101733&show=meta
Live recreation overlay
https://mcatho.me/paintingoverlay
MCP for decompiling & modding Minecraft Alpha 1.1.2_01
http://www.mediafire.com/file/7gq62gydrb12c2a/revengpack16.zip/file
Reddit post:
https://www.reddit.com/r/Minecraft/comments/iqg3ey/the_original_screenshot_seed_of_the_minecraft/
Reveal video:
https://www.youtube.com/watch?v=d8XSBtRIWD0
Minecraft@Home: